
In this tutorial, we will transcribe a call recording in Twilio using AssemblyAI’s API. We will use Python to write the scripts. We will be discussing the following
- GitHub Repo Link
- Libraries/APIs we will use
- Setting up Environment and File Structure
- Creating necessary files
- Creating and Activating Virtual Environment
- Installing required libraries
- Working with the twilio API
- Getting API credentials
- Function to make and record an outgoing call
- Function to get the Recording ID
- The URL to your recording
- Working with the AssemblyAI API
- Getting API Credentials
- Function to queue file and get transcription ID
- Function to make a request to the transcribe endpoint
- Transcribing the recording
Requirements
- Basic Knowledge of Python
- Although not required, familiarity with the requests library will be helpful
GitHub Repo Link
You can find the entire source code here
Libraries/APIs we will use
twilio
Twilio is a service that lets you make/receive calls and SMS using their API. Twilio also provides an official wrapper for their API. The wrapper makes it easier to communicate with their API. For this tutorial, we will use their wrapper.
AssemblyAI
AssemblyAI can convert audio to text. It provides a REST API that is consumable by any modern programming language. Eg: Python, JavaScript, PHP, etc.
Requests
We will be using the Requests library to make requests to AssemblyAI’s REST API.
Python-dotenv
To follow best practices we will store our credentials and phone numbers inside a .env file. The Python-dotenv library helps us to read the credentials from the .env file
Setting up Environment and File Structure
Creating necessary files
Create a new folder/directory using the command line
mkdir twilio_assemblyaiChange directory to the newly created folder
cd twilio_assemblyaiTo keep secret credentials secure, it’s good practice to store credentials inside a .env file. We can then use the Python-dotenv library to read the credentials from the .env file. Let’s go ahead and create the .env file, along with the 3 python files we’ll build together.
If using Windows:
New-Item main.py, transcribe.py, call.py ,.envAnd if using macOS or Linux:
touch main.py; touch transcribe.py; touch call.py ;touch .envHere’s an overview of the files we just created:
- call.py – This file contains the script which will make an outgoing call using twilio and create a recording of that outgoing call
- transcribe.py – This file contains the functions need to interact with AssemblyAI’s API
- main.py – This file pulls together our functions from transcribe.py and call.py, so we have one script that makes a phone call, and then transcribes the recording of that call with AssemblyAI
- .env – This file will contain our secret credentials like our API credentials, phone numbers, and the ID of the outgoing call we make
Creating and Activating Virtual Environment
If this is your first time working with virtual environments, you’ll have to install virtualenv using the below commands:
If using Windows:
python -m pip install --user virtualenvAnd if using macOS or Linux:
python3 -m pip install --user virtualenvEnsure you are in the twilio_assemblyai directory we created in the beginning of the tutorial. If you are not, just use the cd command to change the directory.
cd twilio_assemblyaiFirst, we need to create a virtual environment by entering the following code on the command line:
If using Windows:
python -m venv venvAnd if using macOS or Linux:
python3 -m venv venvWe will then need to activate the local virtual environment with the following command:
If using Windows:
venv/Scripts/activateAnd if using macOS or Linux:
source venv/bin/activateFor more details on how to set up a virtual environment, and how they work, you can refer to the official Python documentation..

Installing required libraries
We will need to install the following libraries which we had discussed in the the “Libraries/APIs we will use” section
- python-dotenv
- requests
- twilio
If using Windows:
pip install twilio, requests, python-dotenvAnd if using macOS or Linux:
pip3 install twilio, requests, python-dotenvWorking with the twilio API
Getting API credentials
- Create a twilio account here. You get a free twilio phone number.
- Using the free phone number provided, you can make outgoing calls to verified numbers only. During the signup process, add your personal number and verify it. We will be calling the verified number. You can add multiple verified numbers here
- Go to your accounts’ dashboard
- Under the section Project Info, you should see your Account SID and Auth Token. These are your credentials for the twilio API. We will store them in the .env file we created earlier.
- Inside the Project Info section, you should also see your twilio phone number. We will save this phone number along with the verified phone number in the .env file.


account_sid = "YOUR TWILIO ACCOUNT SID"
auth_token = "YOUR TWILIO AUTH TOKEN"from_phone_number = "YOUR TWILIO PHONE NUMBER"
to_phone_number = "YOUR VERIFIED NUMBER"
Function to make and record an outgoing call
We will use the twilio library to make the phone call. All the code in this section should be in the call.py file. First, let’s import the required libraries
import os
from dotenv import load_dotenv
from twilio.rest import Client
import requests
from requests.auth import HTTPBasicAuth
Client lets us create an instance of twilio’s wrapper. We will use the methods of this instance to make the call. Before creating the instance, let’s define a function.
def make_phone_call(client,from_phone_number,to_phone_number):
    return None
The above function will accept a twilio client instance, our twilio phone number, and the verified phone number we verified as parameters. For now, let’s leave it empty. We will come back to it later.
Now, lets load our credentials and phone numbers from the .env. The credentials will be needed to create a twilio client instance.
if __name__ == '__main__':
    load_dotenv()
    account_sid = os.environ.get('account_sid')
    auth_token = os.environ.get('auth_token')
    from_phone_number = os.environ.get('from_phone_number')
    to_phone_number = os.environ.get('to_phone_number')

    client = Client(account_sid, auth_token)
    call_sid = make_phone_call(client, from_phone_number, to_phone_number)

    print(f'Call sid is {call_sid}')
The above code snippets creates a twilio client instance. The make_phone_call is invoked and the twilio client instance along with the phone numbers are passed as arguments.
Now, let’s write the make_phone_call function, which will make and record an outgoing call to our verified phone number. The function will return the ID of the outgoing call. This ID will need to be stored in the .env file, we created earlier.
def make_phone_call(client_,from_phone_number_,to_phone_number_):
    '''
    Parameter:
        client: A twillio client instance
    Return:
        call.sid: The sid of the outgoing call
    '''
    phone_call = '''<Response>
    <Say>What are you working on?</Say>
    <Pause length="5"/>
    </Response>'''

    call = client_.calls.create(
                            record = True,
                            twiml=phone_call,
                            from_=from_phone_number_,
                            to = to_phone_number_
                        )
    return call.sid
The variable phone_call is the script that will be read/played when we make the outgoing call. It has to be written in TwiML, which is similar to HTML/XML. For the purposes of this tutorial, we only need to focus on the following TwiML elements:
- Say – The content between this tag is simply spoken during the outgoing
- Pause – It pauses and lets the callee talk. It has an attribute length which is the duration for how long the call is paused.
- Response – It is similar to the html tag. Basically, the entire script has to be between the Response tags
So putting the pieces together, this is what the script in the variable phone_call does
- Asks the callee what they are doing
- Waits for 5 seconds for the callee to speak
The calls.create method of the client instance makes an outgoing phone call. It accepts the following parameters
- record – A boolean value that tells twilio to record the phone call
- twiml – The script to be played during the call
- from_ – The number which will make the call. In our case, it’s the twilio number
- to – The number which we want to call. As mentioned before, it has to be a verified number if you are using a free account.
Once you run a script, you should receive a call on your verified number. Type the following command to run the script

If using Windows:
| python call.py |
And if using macOS or Linux:
| python3 call.py |
Below is the output of the make_phone_call function

Note down the call sid which is returned by the make_phone_call function. Next, store your call sid in your .env file.
| call_sid = ‘YOUR CALL SID’ |
In case you run into any errors, you can check the programmable voice dashboard.
Twilio provides helpful messages to debug error messages. A common error is the format of the script. Ensure there is no extra space or new lines in the script. Below is an example of a error in the dashboard

Function to get the Recording ID
Twilio provides the following API endpoint to get the Recording IDs of a specific call. It’s important to note that a call can have multiple recordings associated with it, but in our case we only have a single recording of the entire call. , eg: recording of a specific time frame. Our call has a single recording, which is the recording of the entire call.
https://api.twilio.com/2010-04-01/Accounts/{account_sid}
/Calls/{call_sid_}/Recordings.json
Twilio uses HTTPBasicAuth to authenticate requests made to it’s API endpoints. Below, we’re going to write a function which gets the ID of the recording of our call, which we need in order to download that recording.
def get_recording_sid(account_sid_,auth_token_,call_sid_):
    '''
    Parameter:
        account_sid: Twilio Account SID,
        auth_token: Twilio API Key/Auth Token
        call_sid_: Call Sid
    Return:
        recording.sid: The sid of the recording
    '''
    url = f"https://api.twilio.com/2010-04-01/Accounts/{account_sid_}"\
        + f'/Calls/{call_sid_}/Recordings.json'
    result = requests.get(url , auth = HTTPBasicAuth(account_sid_,     auth_token_))
    recordings  = result.json()
    # Since our call has a single recording, we just need to access the first
    # element in the list of recordings. If a call has multiple recordings
    #  associated with it, this list will contain the SIDs of all the
    #  recordings.
    recording_sid = recordings['recordings'][0]['sid']
    return recording_sid
Once you have a twilio Call ID, you can invoke the get_recording_sid function to get a recording ID. Below is how you would invoke the function
recording_sid = get_recording_sid(account_sid, auth_token, call_sid)
print(f"Recording Sid: {recording_sid}")
The arguments account_sid and auth_token are your twilio API credentials.
Below is a sample output
| Recording Sid: REe5c2f483b17755f76492f516e7c7df5a |
We will invoke the get_recording_sid in main.py
The URL to your recording
We can access our recording’s mp3 file by going to the following URL
https://api.twilio.com/2010-04-01/Accounts/{account_sid}/Recordings/{recording_sid}.mp3'You just have to replace the {account_sid} with your twilio Account’s ID and the {recording_sid} with your recording’s ID that we retrieved from the above function.
Working with the AssemblyAI API
The functions in this section will be written in transcribe.py
Getting API Credentials
- Go to https://www.assemblyai.com/
- Sign Up for an account

- Go to https://app.assemblyai.com/dashboard/
- Copy the string under your API Key
- Store the token in the .env file

| assemblyai_token = “Your AssemblyAI API Key” |
Before writing the functions, we need to import the request library
| import requests |
Function to queue file and get transcription ID
We will use the recording URL and make a request to the endpoint which will start the transcription status.
Initially, when we request a transcription of the audio file, it has a status of “queued”. We will talk more about how the file goes from being “queued” to “complete” in the later sections. For now, we only need to make a request to the Transcription Endpoint along with the URL to the file. We need to make a request to the following AssemblyAI API endpoint:
| https://api.assemblyai.com/v2/transcript |
This endpoint accepts new transcription jobs. Below is a function that accepts an AssemblyAI API token and an URL to the audio file as parameters.
def get_transcribe_id(token,url):
    '''
        Parameter:
        token: The AssemblyAI API key
        url  : Url to uploaded file
        Return Value:
        id   : The transcribe id of the file
    '''
    endpoint = "https://api.assemblyai.com/v2/transcript"
    json = {
      "audio_url": url
    }
    headers = {
      "authorization": token,
      "content-type": "application/json"
    }
    response = requests.post(endpoint, json=json, headers=headers)
    id_ = response.json()['id']
    print("Made request and file is currently queued")
    return id_
The function accepts a couple of the parameters: the AssemblyAI API token and an audio file URL.
We can use the get_recording_sid function to get the recording id and create the endpoint which contains our twilio call recording. The below code should be written in main.py. However, for testing our above function, we can include it inside transcribe.py. Ensure to load the Twilio credentials, AssemblyAI token and Recording SID from the .env file. Refer to the section “Function to make and record an outgoing call” to load variables from the .env file.
recording_sid = get_recording_sid(account_sid, auth_token, call_sid)
print(f"Recording Sid: {recording_sid}")
recording_endpoint = 'https://api.twilio.com/2010-04-01/Accounts/' \
+ f'{account_sid}/Recordings/{recording_sid}.mp3'
We will use the get_transcribe_id function and pass this recording endpoint as an argument.
| transcribe_id = get_transcribe_id(assemblyai_token,recording_endpoint) print(f”Transcription ID is {transcribe_id}”) |
Below is a sample output of the get_transcribe_id function
| Transcription ID is uyzt6qhog-15d8-4af4-a87f-bdc66a2a56f2 |
The transcription ID helps us check the status of our transcription. We need to pass this ID as a parameter to a separate endpoint (discussed below) and keep on making requests to get the status of the transcription. We will keep on making requests till the transcription is complete.
Function to check the transcription status
Once we have the transcription ID of the audio file, we can make a GET request to the following AssemblyAI API endpoint to check the status of the transcription
| https://api.assemblyai.com/v2/transcript/{transcribe_id} |
The status of transcription changes from “queued” to “processing” to “completed” as long as no errors are encountered or “error” if an error is encountered. If an audio file transcription is not currently in progress, the new file is immediately processed. If there is a transcription in progress, then the new audio file is queued until the previous job is complete. If you wish to be able to run multiple jobs simultaneously, you will need to upgrade to a premium plan
We will need to poll this endpoint until we get a response object with the status “completed” or “error”. Basically, keep on making requests to this endpoint and check the status.
def get_text(token,transcribe_id):
    '''
      Parameter:
        token: The AssemblyAI API key
        transcribe_id: The ID of the file which is being
      Return Value:
        result : The response object
    '''
    endpoint = f"https://api.assemblyai.com/v2/transcript/{transcribe_id}"
    headers = {
      "authorization": token
    }
    result = requests.get(endpoint, headers=headers).json()
    return result
The above function simply takes in the AssemblyAI API token and the transcription ID as parameters and returns the result which contains the status of the transcription. Below is a while loop which keeps on making requests to the endpoint.
We can make use of a while loop to continuously invoke the above function and make requests to the endpoint. During each iteration of the loop, we will check the status of the transcription. The loop will keep on running till the status is “completed”. This process of making requests and waiting till the status is complete is known as polling.
result = {}
print("AssemblyAI is processing the file")
while result.get("status") != 'completed' and result.get("status") != 'error':
    time.sleep(2)
    result = get_text(assemblyai_token,transcribe_id)

print("Transcription Complete - The result is below")
print(result['text'])
To limit the number of requests we make, we will add a sleep function between requests. Below is what the output would look like

The polling using the while loop should be done in the main.py file. We will discuss the main.py file below.
Transcribing the recording
We will use the functions from transcription.py and the Twilio recording ID to transcribe the outgoing call. The code in this section should be written in main.py.
First, let’s import the necessary libraries and methods
import os
from dotenv import load_dotenv
from transcribe import get_transcribe_id, get_text
from call import get_recording_sid
Next, we will load the required data from the .env file
# Reading Data from .env file
load_dotenv()
account_sid = os.environ.get('account_sid')
call_sid = os.environ.get('call_sid')
auth_token = os.environ.get('auth_token')
assemblyai_token = os.environ.get('assemblyai_token')
We will use the get_recording_sid function to get the recording id
| recording_sid = get_recording_sid(account_sid, auth_token, call_sid) print(f”Recording Sid: {recording_sid}”) |
Now, we will use the recording ID and create the URL to our recording
| recording_endpoint = ‘https://api.twilio.com/2010-04-01/Accounts/’ \ + f'{account_sid}/Recordings/{recording_sid}.mp3′ |
We will use the get_transcribe_id function and pass this recording endpoint as an argument.
| transcribe_id = get_transcribe_id(assemblyai_token,recording_endpoint) print(f”Transcription ID is {transcribe_id}”) |
Once we get the transcription ID, we will poll the transcription endpoint to get the status of the transcription.
result = {}
print("AssemblyAI is processing the file")
while result.get("status") != 'completed':
result = get_text(assemblyai_token,transcribe_id)
print("Transcription Complete - The result is below")
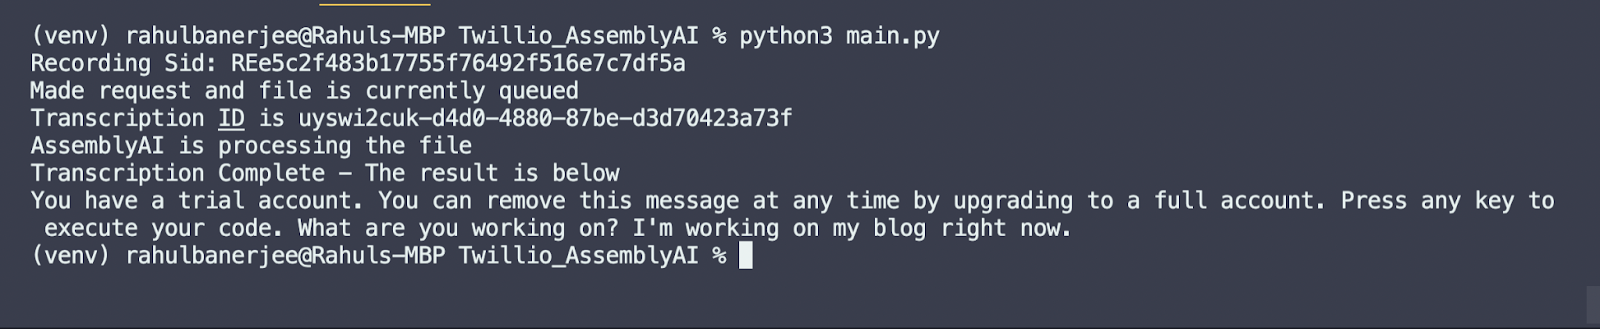
print(result['text'])To run the main.py file:
If using Windows:
| python main.py |
And if using macOS or Linux:
| python3 main.py |
Below is the output
Conclusion
Congratulations! 👏 You have successfully written a script that can transcribe audio. If you’d like to build on top of this, you could try to add the transcription as a note on the call log.